
How to Take a Professional Headshot with Your iPhone (Without Losing Your Mind)
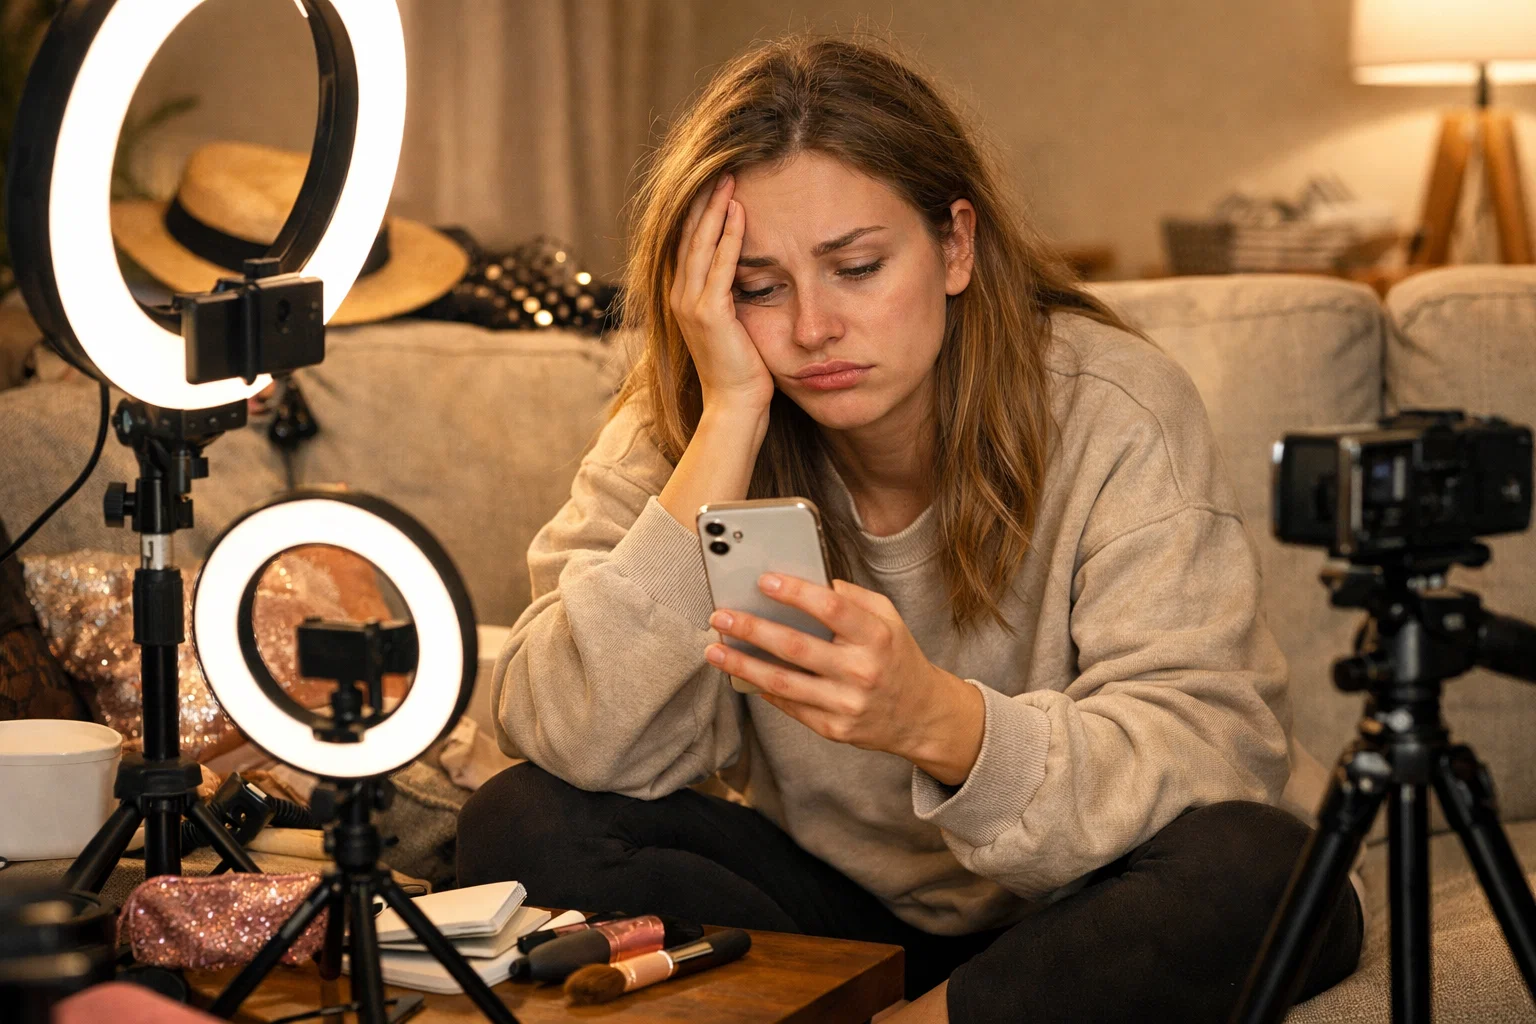
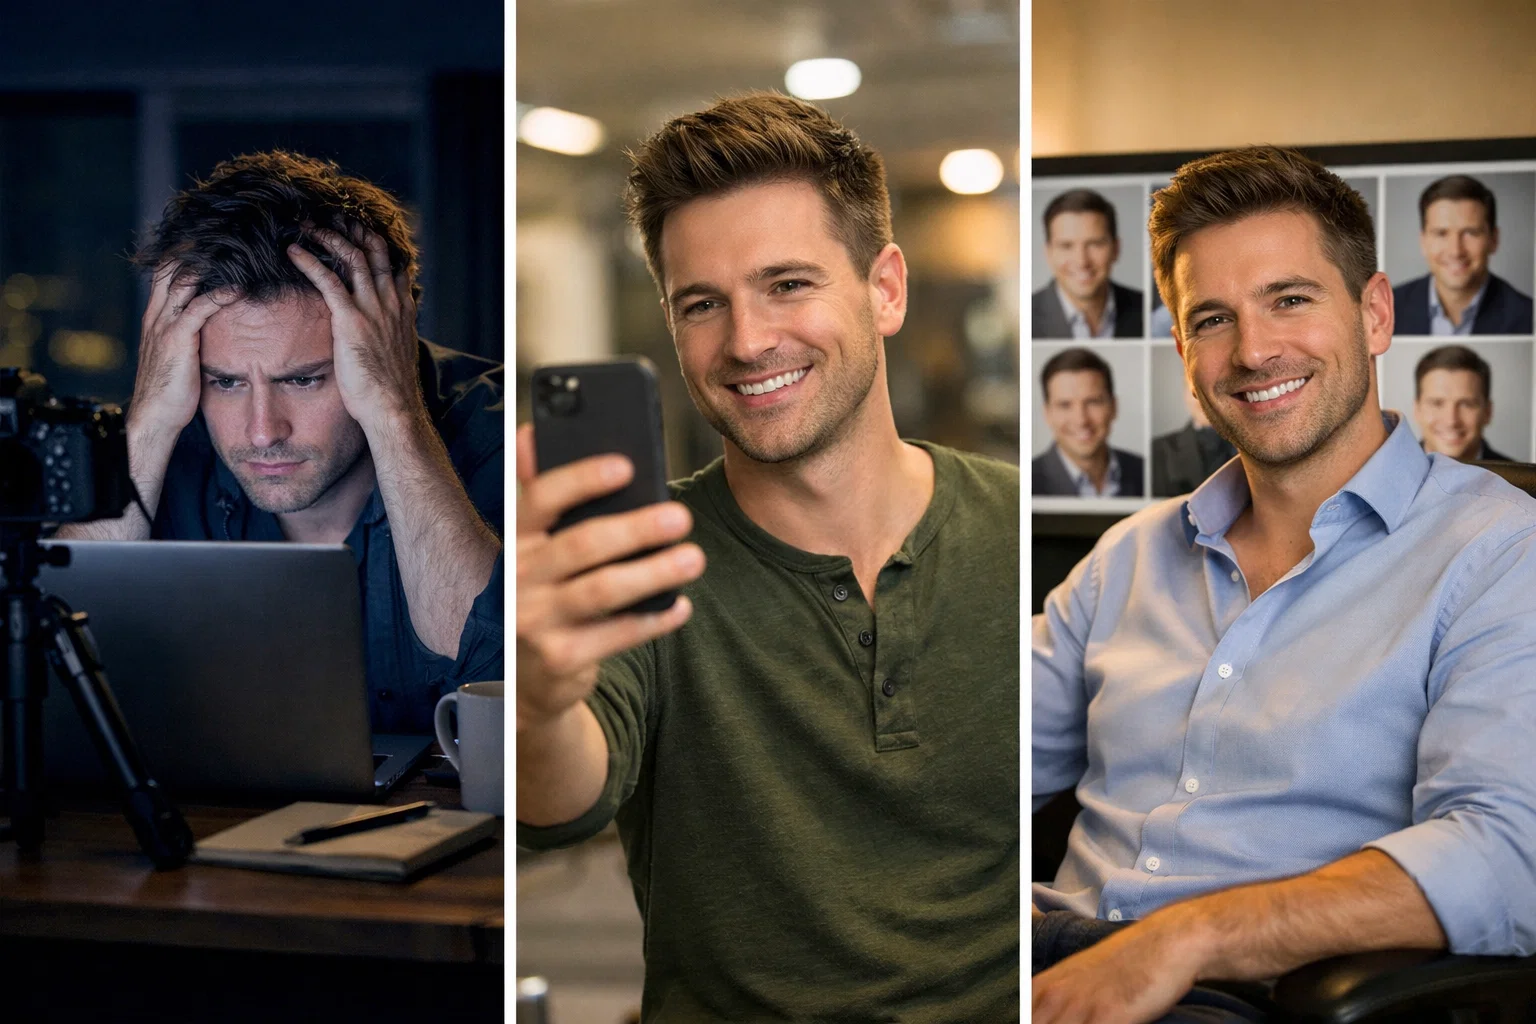
You need a professional headshot. Like, today. Your LinkedIn looks sad, your company website still has that photo from 2019, and every time someone asks for a headshot, you panic.
So you think: "I'll just take one with my iPhone. How hard can it be?"
Three hours later, you've taken 127 photos. Your face looks weird in all of them. Your nose looks huge. The lighting is terrible. You're sweating. And you still don't have a single usable headshot.
Welcome to the iPhone headshot nightmare we've all lived through.
Here's the truth: your iPhone can take great headshots. But not the way you're doing it. And honestly? There's a much easier solution that doesn't involve turning your living room into a photography studio.
Main Takeaway
Your iPhone can absolutely take professional headshots — but most people do it wrong. The real issue? Lighting makes you look like you're in an interrogation room. Your front camera distorts your face. And holding your phone at arm's length creates the worst possible angle. But here's the good news: with a few simple tricks (or better yet, using AI to skip this entirely), you can get headshots that actually look professional. No $500 photographer required.
Why Your iPhone Selfies Look So Bad
Let's be honest about what happens when you try to take a professional headshot with your iPhone:
The Front Camera Makes Your Face Look Weird
That selfie camera distorts your face with a wide-angle lens. Your nose looks bigger. Your face looks wider. It's the worst angle for headshots, but it's the easiest one to use. So you end up with 47 photos that all look... off.

The Lighting Is Always Wrong
Bathroom lighting? Makes you look sick. Natural window light? Great — if you happen to live somewhere with perfect golden hour light exactly when you need a photo (spoiler: you don't). Overhead lights? Instant unflattering shadows under your eyes.
You've tried everything. The ring light you bought on Amazon. The desk lamp pointed at your face. Standing near different windows. Nothing works.
You Can't Get the Angle Right
Holding your phone at arm's length? Terrible angle. Propping it up on a stack of books? Now you're crouching awkwardly. Using the timer? You've got 3 seconds to run into position, smile naturally, and hope for the best. (It never works.)
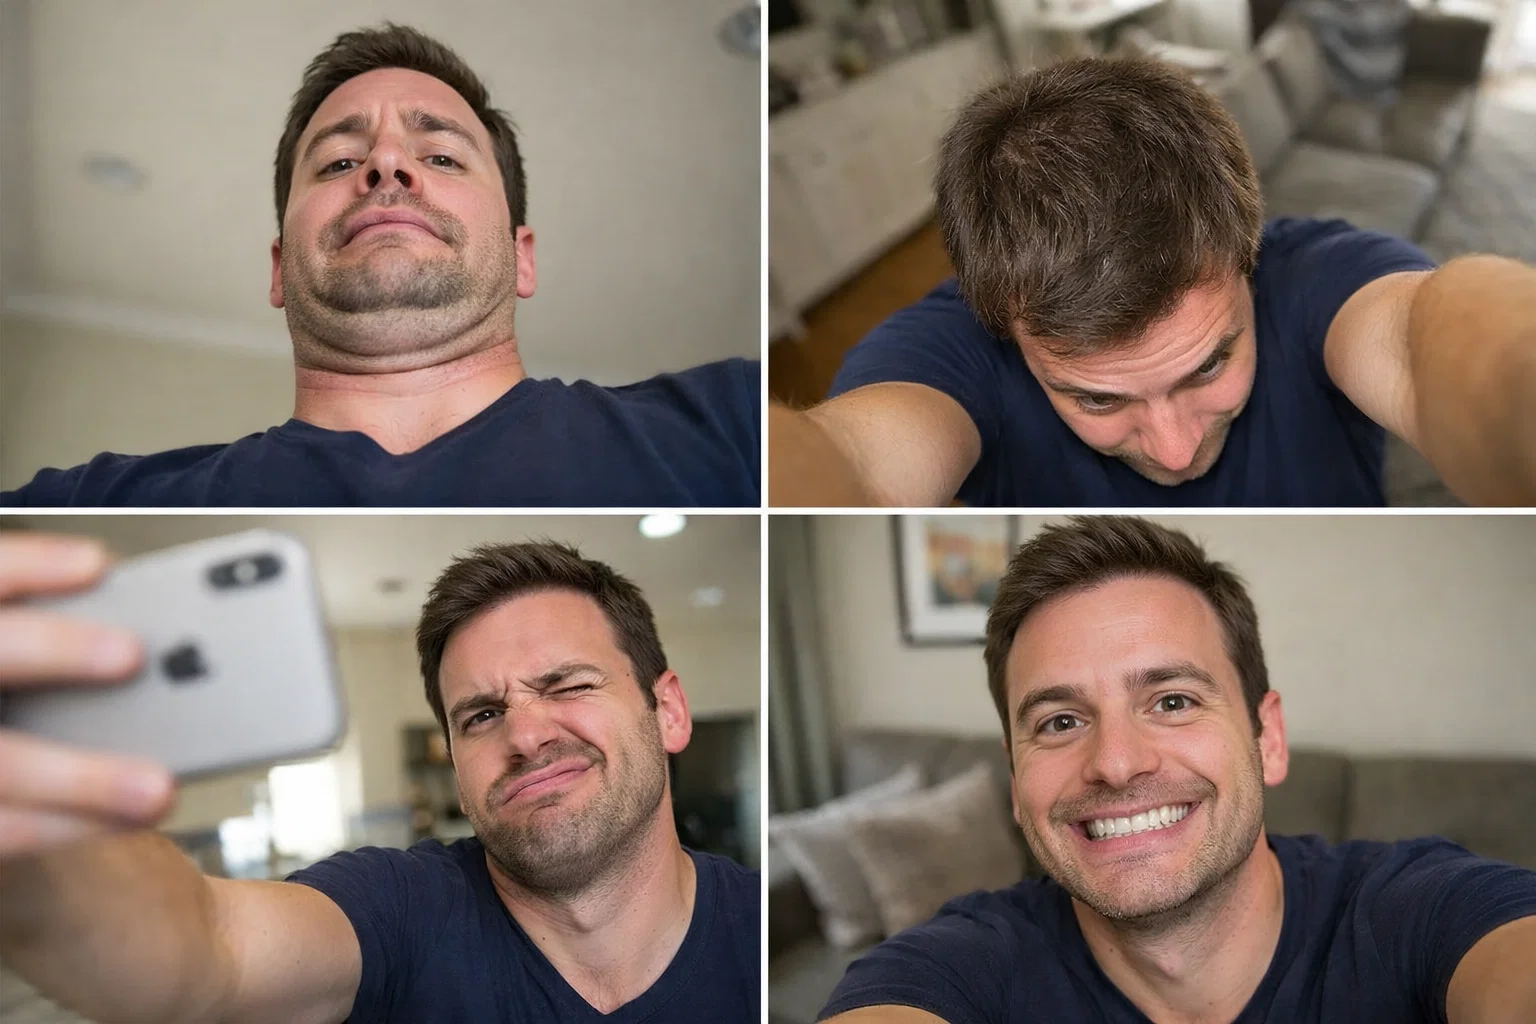
You Look Weird in Every Single Photo
By photo number 50, you can't even tell anymore. Does this one look okay? Is this smile natural or do you look like a serial killer? Should you tilt your head? Why does your left eyebrow do that thing?
Analysis paralysis sets in. You've been staring at your own face for so long that nothing looks right anymore.
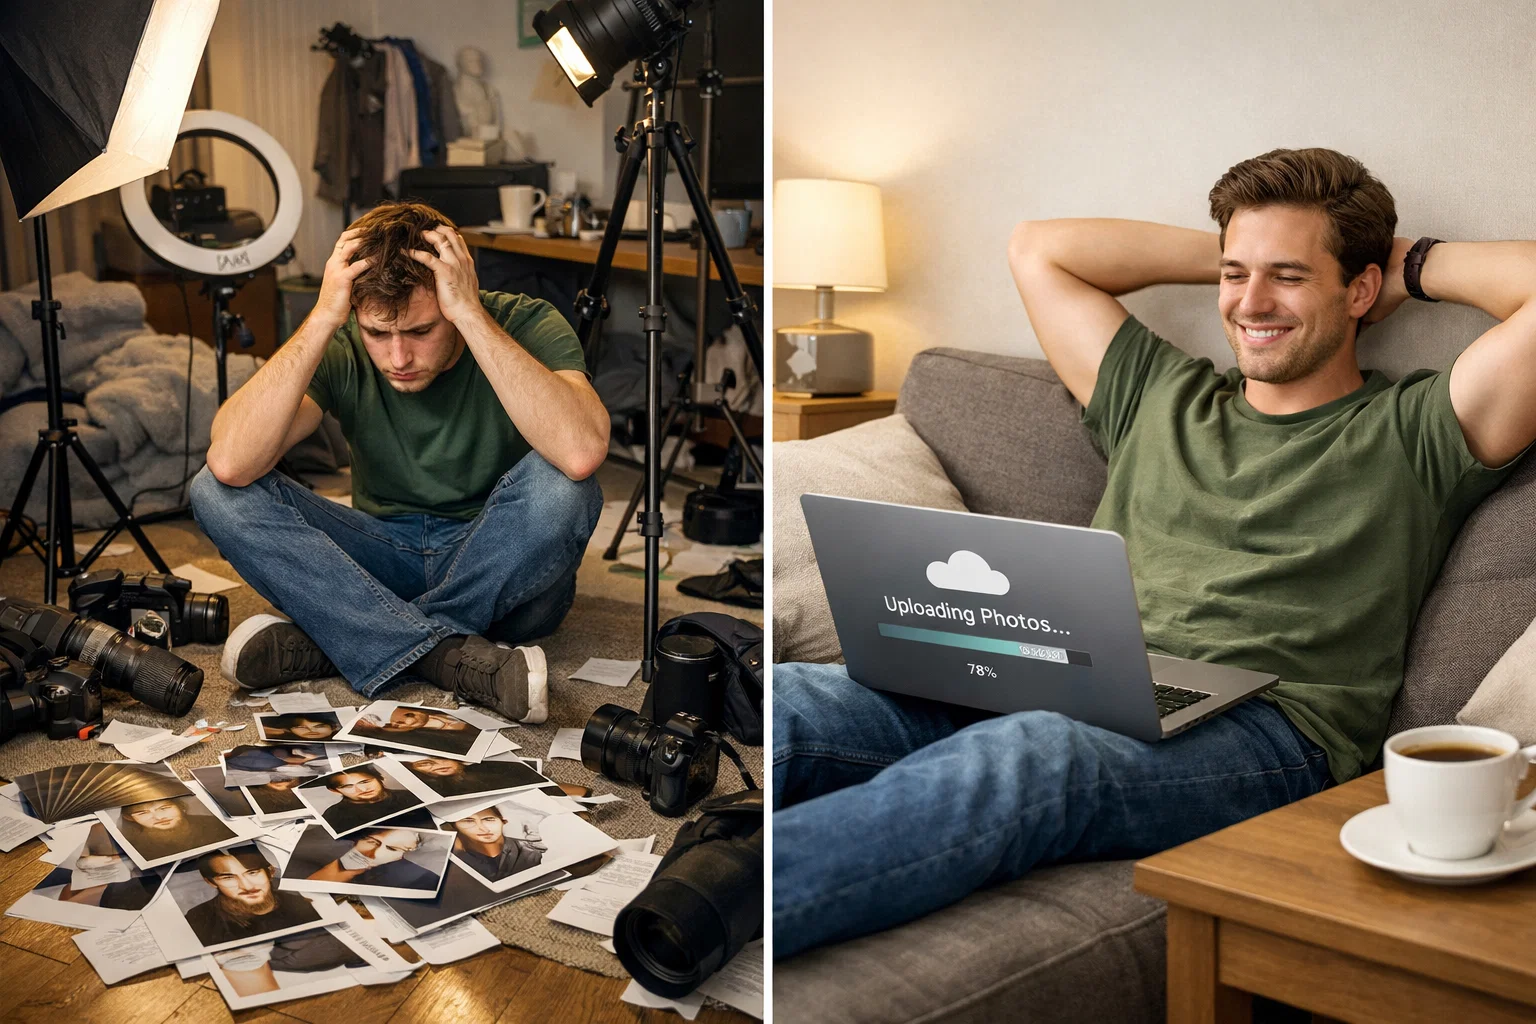
The Smarter Solution: Skip the iPhone Photoshoot Entirely
Look, I'm going to level with you. Yes, you can take professional headshots with your iPhone. You can buy a $20 tripod, find perfect natural light, learn the right camera settings, take 200 photos, and maybe — maybe — get one decent shot.
Or you could use MyPicNow and get 60+ professional headshots in 8 seconds.
Here's how it works: Upload 10-15 casual selfies (the ones already on your phone work fine). Our AI learns your face, then generates professional headshots with perfect lighting, clean backgrounds, and natural expressions. No setup. No stress. No 3-hour photo sessions in your living room.
The difference? Instead of spending your afternoon becoming an amateur photographer, you spend 15 minutes uploading photos and then generate unlimited headshots whenever you need them.
The Complete DIY iPhone Headshot Guide
Alright, you want to do this yourself. Respect. Here's the full step-by-step process that actually works:
Phase 1: Setup (10 minutes)
Get a phone tripod ($15-20 on Amazon): You need stable shots. Your arm gets tired, and the angle is terrible when you're holding it.
Find your lighting: Stand 2-3 feet from a large window. Face the window (not with it behind you). Morning (8-10am) or late afternoon (4-6pm) gives you soft, flattering light. Avoid midday harsh sunlight.
Clean background: Plain wall. Remove clutter. Move the pile of laundry. The simpler, the better.
Position the tripod: 3-4 feet away from where you'll stand. Camera at eye level or slightly above (max 6-12 inches). Never below eye level.
Phase 2: Camera Settings
Open your iPhone camera app and configure:
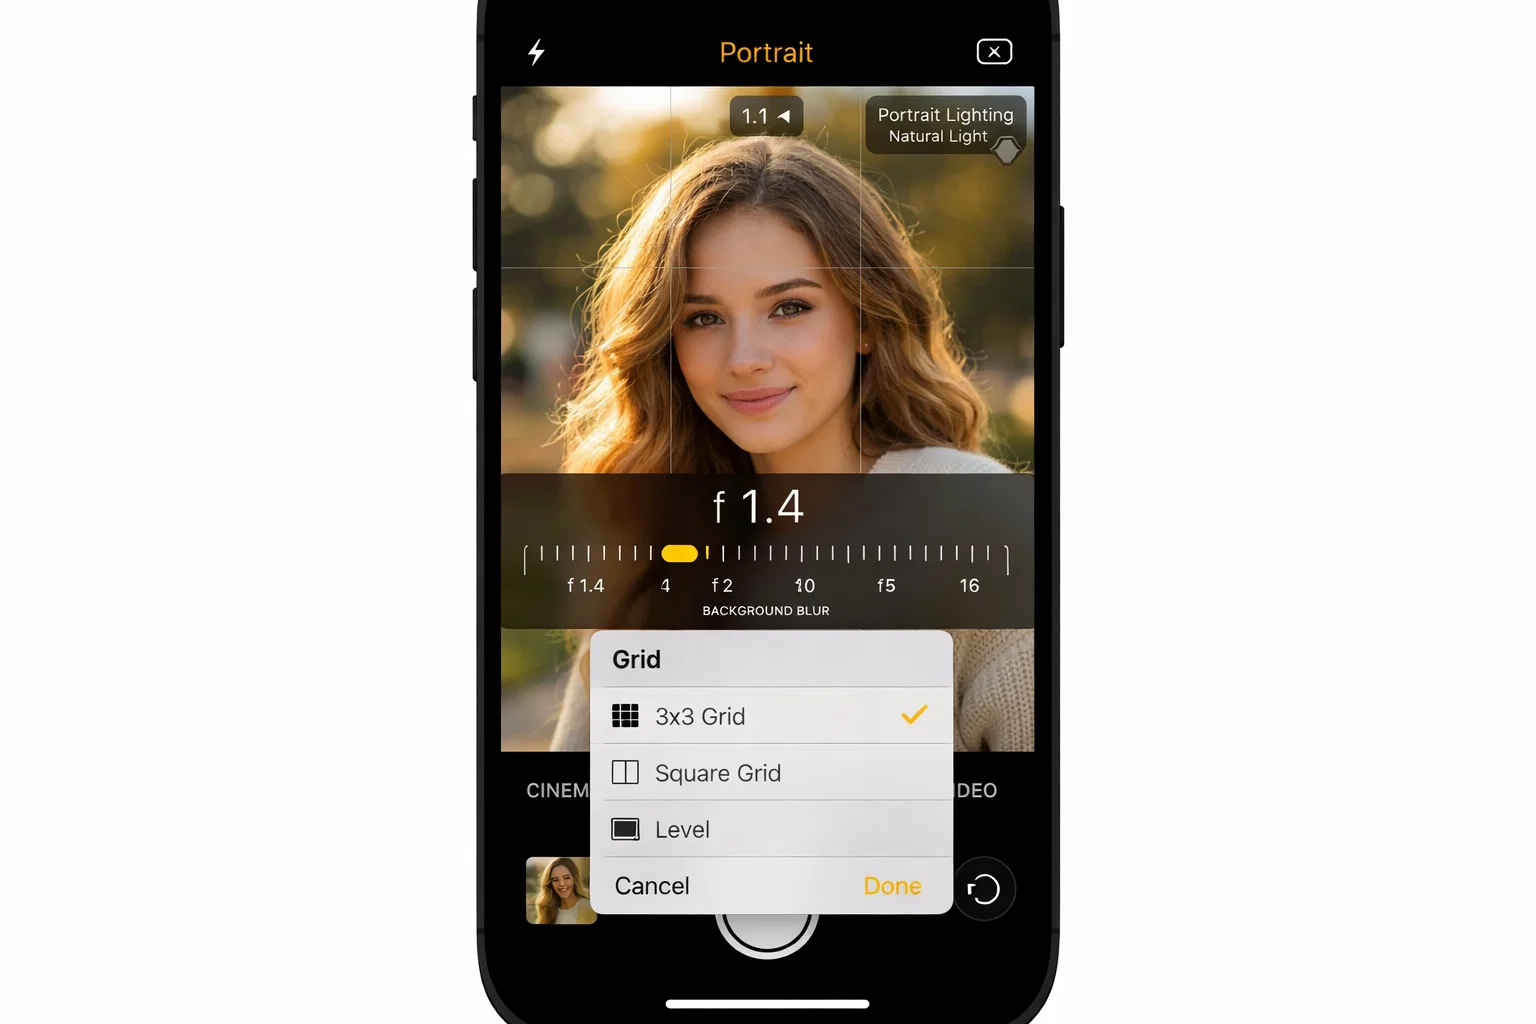
1. Use Portrait Mode
- Swipe to Portrait mode
- Select "Natural Light" effect (avoid the dramatic ones)
- Adjust the f-stop slider: Set between f/2.8 to f/4 for natural-looking background blur
- Too much blur (f/1.4) looks fake. Too little defeats the purpose.
2. Lock Your Focus and Exposure
- Frame yourself in the shot
- Tap and hold on your face until "AE/AF LOCK" appears
- This prevents the camera from refocusing or changing brightness mid-shoot
3. Enable the Grid
- Go to Settings > Camera > Grid (turn on)
- Use it to position yourself properly using the rule of thirds
4. Set the Timer
- Use 3-second or 10-second timer
- This eliminates camera shake from pressing the button
- Gives you time to get into position and look natural
Phase 3: Taking the Photos (20-30 minutes)
Start with test shots:
- Take 3-5 photos to check framing and lighting
- Review them. Is your face well-lit? Eyes sharp? Background clean?
- Adjust your position or the tripod as needed
Body positioning:
- Turn your shoulders 15-30 degrees away from camera
- Turn your head back toward the lens
- Shoulders back and down
- Extend your neck slightly forward (defines jawline, prevents double chin)
Expressions to capture:
- Neutral/serious (3-5 shots)
- Slight smile (5-10 shots)
- Genuine smile (5-10 shots)
- Confident/determined (3-5 shots)
Take 30-50 total photos. Different angles, different expressions. Most will be bad. That's normal. You need options.
Pro tip: Take photos over 2 different sessions if possible. Your face looks different depending on sleep, stress, time of day. This variety helps you find your best look.
Phase 4: Selecting and Editing (15-20 minutes)
Review all your photos. Look for:
- Sharp focus on eyes (most important)
- Natural expression (not forced)
- Clean background
- Good exposure (not too bright or dark)
- Flattering angle
Pick your top 5-10 images.
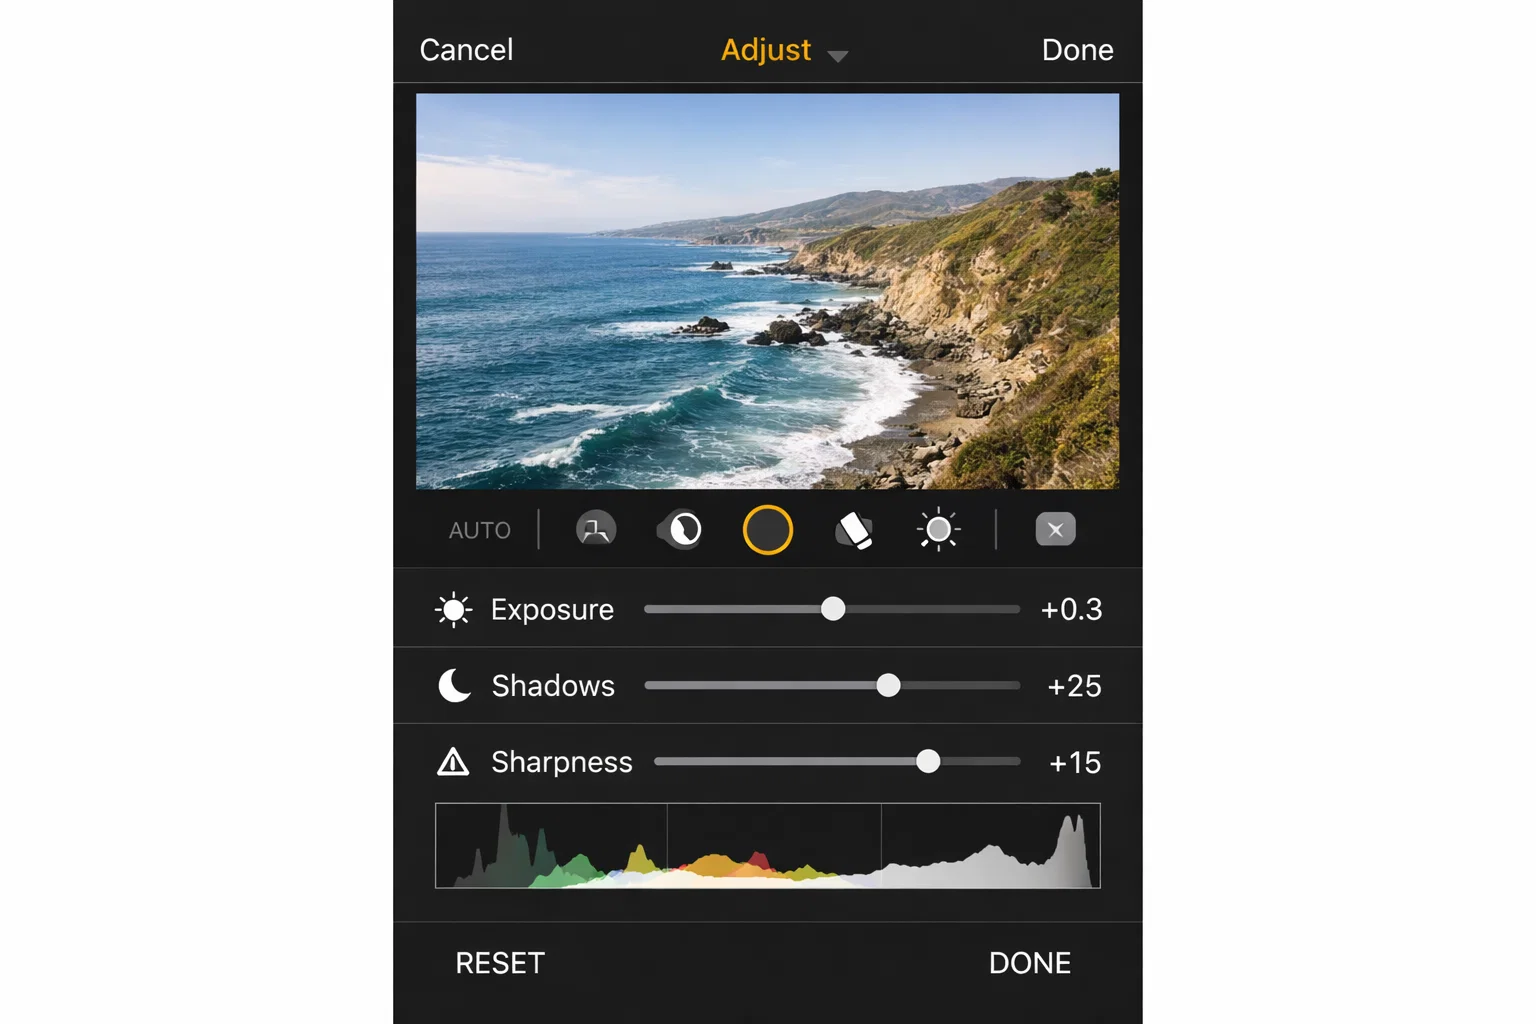
Basic editing in Photos app:
- Open photo
- Tap Edit
- Adjust:
- Exposure: +5 to +15 (brighten slightly)
- Highlights: -10 to -20 (reduce blown-out areas)
- Shadows: +10 to +20 (lift dark areas under eyes)
- Contrast: +5 to +10 (add subtle punch)
- Sharpness: +10 to +20 (add definition)
Don't overdo it. Subtle edits look professional. Heavy filters look fake.
Total time investment: 45-60 minutes for your first session. Once you know the process, updates take 30-40 minutes.
Does this work? Yes. With proper setup and technique, iPhone headshots can look professional.
The trade-off? Time and effort. If you enjoy photography, this is rewarding. If you need photos by tomorrow and don't want to spend an hour, MyPicNow generates professional headshots from casual selfies in 8 seconds. Same quality, 90% less time.
The Real Challenges (And How to Handle Them)
The DIY method works, but you'll face these challenges:
- Lighting changes constantly. Clouds move, sun shifts. Solution: Take all photos within a 15-minute window, or shoot on overcast days for consistent light.
- You can't see yourself. Using the back camera means guessing composition. Solution: Take test shots, review, adjust. Expect to iterate.
- Expressions feel forced after 20+ shots. Solution: Take breaks. Listen to music. Relax between sets.
- Updates require full re-setup. New haircut? New background? You're doing the whole process again. (This is where MyPicNow shines — upload new selfies, generate fresh headshots in 8 seconds, no setup.)
These aren't dealbreakers. They're just time costs. If you have 60 minutes and enjoy the process, DIY works great. If you're busy and need results now, AI is the shortcut.
When to Use DIY vs. AI: Real Scenarios
Here's when each approach makes the most sense:
Scenario 1: You Need LinkedIn Photos by Tomorrow
DIY works if: You already have a tripod, good window light, and 60 minutes free. Follow the guide above, you'll get usable results.
AI is faster if: You're busy. MyPicNow lets you upload existing selfies and generate professional headshots in 8 seconds. 15 minutes total vs. 60+ minutes for DIY.
Winner: AI for speed. DIY if you enjoy the process.
Scenario 2: You Just Got a Haircut and Need Updated Photos
DIY works if: You have your setup saved and know the process. Still takes 30-40 minutes to reshoot and edit.
AI is faster if: You want consistency. Upload 2-3 new selfies, generate headshots that match your existing style across all platforms. 5 minutes.
Winner: AI for frequent updates. DIY if this is a one-time thing.
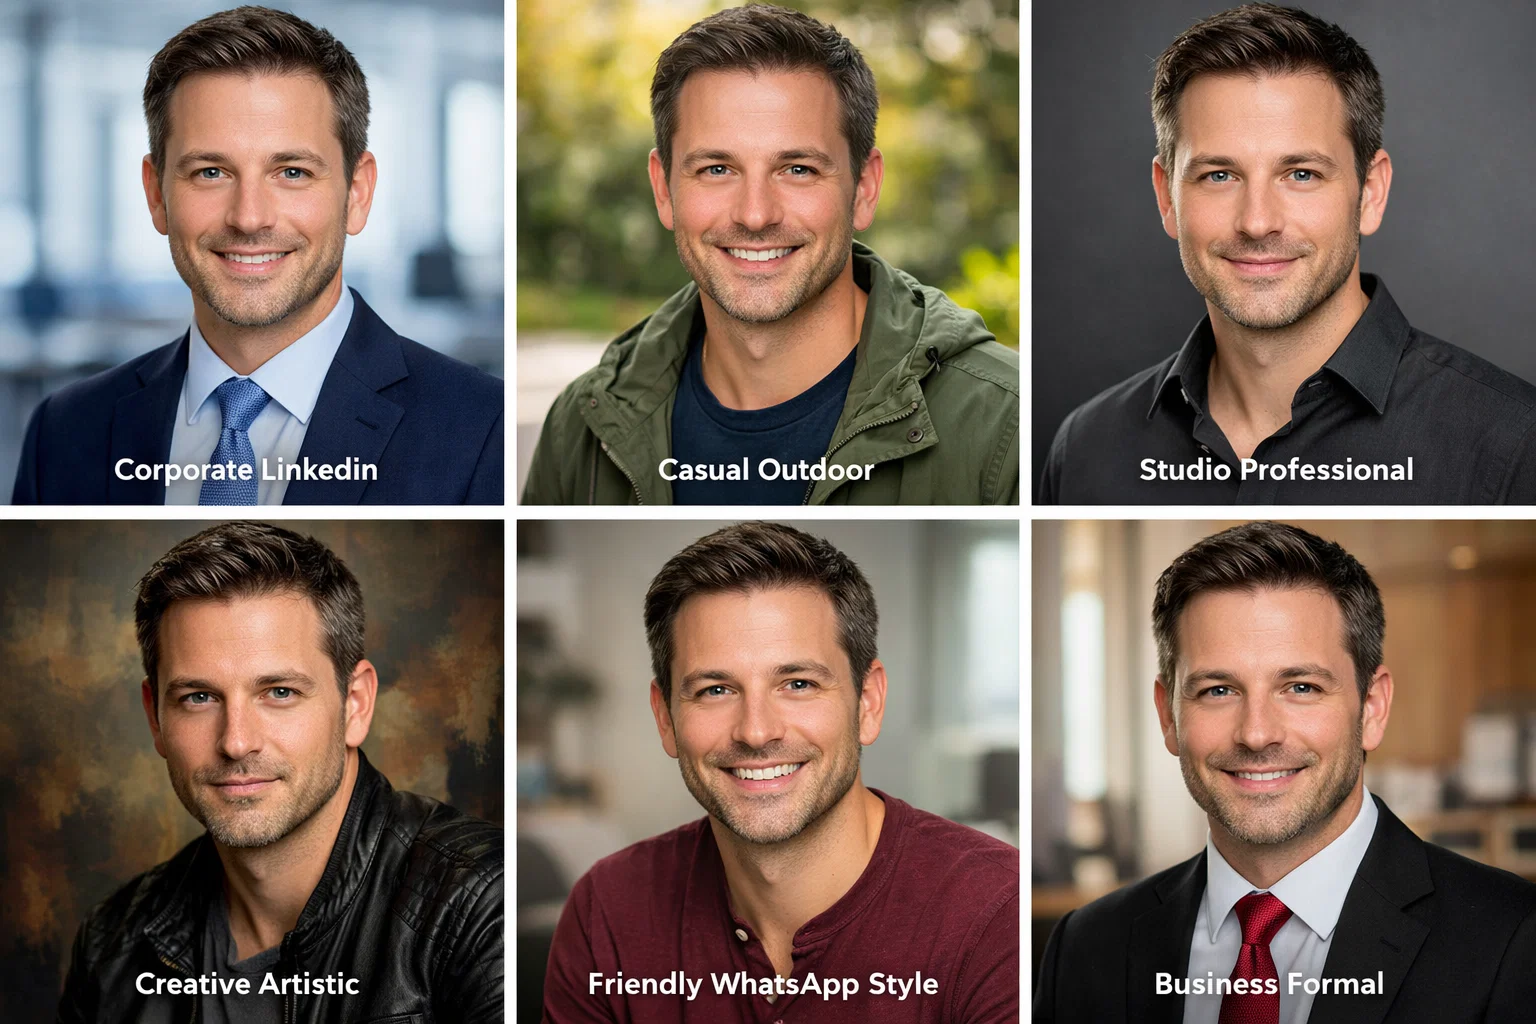
Scenario 3: You Need Different Looks for Different Platforms
DIY works if: You're willing to do multiple sessions. Corporate for LinkedIn, casual for Instagram, friendly for WhatsApp. That's 3 separate shoots with outfit changes.
AI is faster if: You want variety without reshoots. One upload generates corporate, casual, creative versions optimized for each platform.
Winner: AI for variety. DIY if you only need one style.
The Economics: What This Actually Costs You
Let's be real about what you're spending — both money and time:
| Option | Upfront Cost | Time Investment | Quality | Updating Later |
|---|---|---|---|---|
| Professional Photographer | $300-800 | Half day + travel | Excellent | Pay again |
| DIY iPhone Setup | $15-50 (tripod) | 3-4 hours first time, 1 hour each update | Hit or miss | Redo entire process |
| MyPicNow AI | $19+ | 15 min setup, 8 seconds per photo | Professional | Upload new selfies, instant updates |
The hidden cost nobody talks about: Your time is worth something. If you value your time at even $25/hour, that 3-4 hour DIY session just cost you $75-100. Plus the mental energy of figuring it all out.
Different Photos for Different Platforms
Not all headshots are created equal. What works on LinkedIn looks weird on Tinder. What works on Instagram feels too casual for your company website.
LinkedIn Headshots
What you need: Professional but approachable. Clean background. Business attire (or business casual depending on your industry). Confident smile.
DIY challenge: You need to look corporate without looking stiff. Most people either look too casual or like they're attending a funeral.
Why AI works: MyPicNow generates corporate-appropriate headshots with the right vibe for your industry. Tech startup? Slightly casual. Finance? Executive-level polish. All from the same upload.
WhatsApp Profile Photos
What you need: Friendly, recognizable, works at small sizes. Since it's circular, composition matters.
DIY challenge: Most people crop a random photo and call it done. Looks terrible at thumbnail size.
Why AI works: Optimized for circular crop. Natural, friendly expression. Works perfectly at small display sizes.
Dating App Photos
What you need: Attractive but authentic. Warm smile. Real lighting. Not overly polished.
DIY challenge: You take 100 photos. They all look either too tryhard or too casual. You can't find the middle ground.
Why AI works: Natural-looking headshots that make you look good without looking fake. Multiple style options so you can test what works.
Actor Headshots
What you need: Shows your range. Natural expressions. High resolution. Clean, neutral background.
DIY challenge: Casting directors can spot amateur headshots instantly. The lighting's wrong, the crop's wrong, the whole vibe screams "I did this in my apartment."
Why AI works: Professional studio-quality lighting and backgrounds. Multiple expression variations. Export at full resolution for submissions.
Common Mistakes That Waste Your Time
If you're going to try the DIY route, at least avoid these disasters:
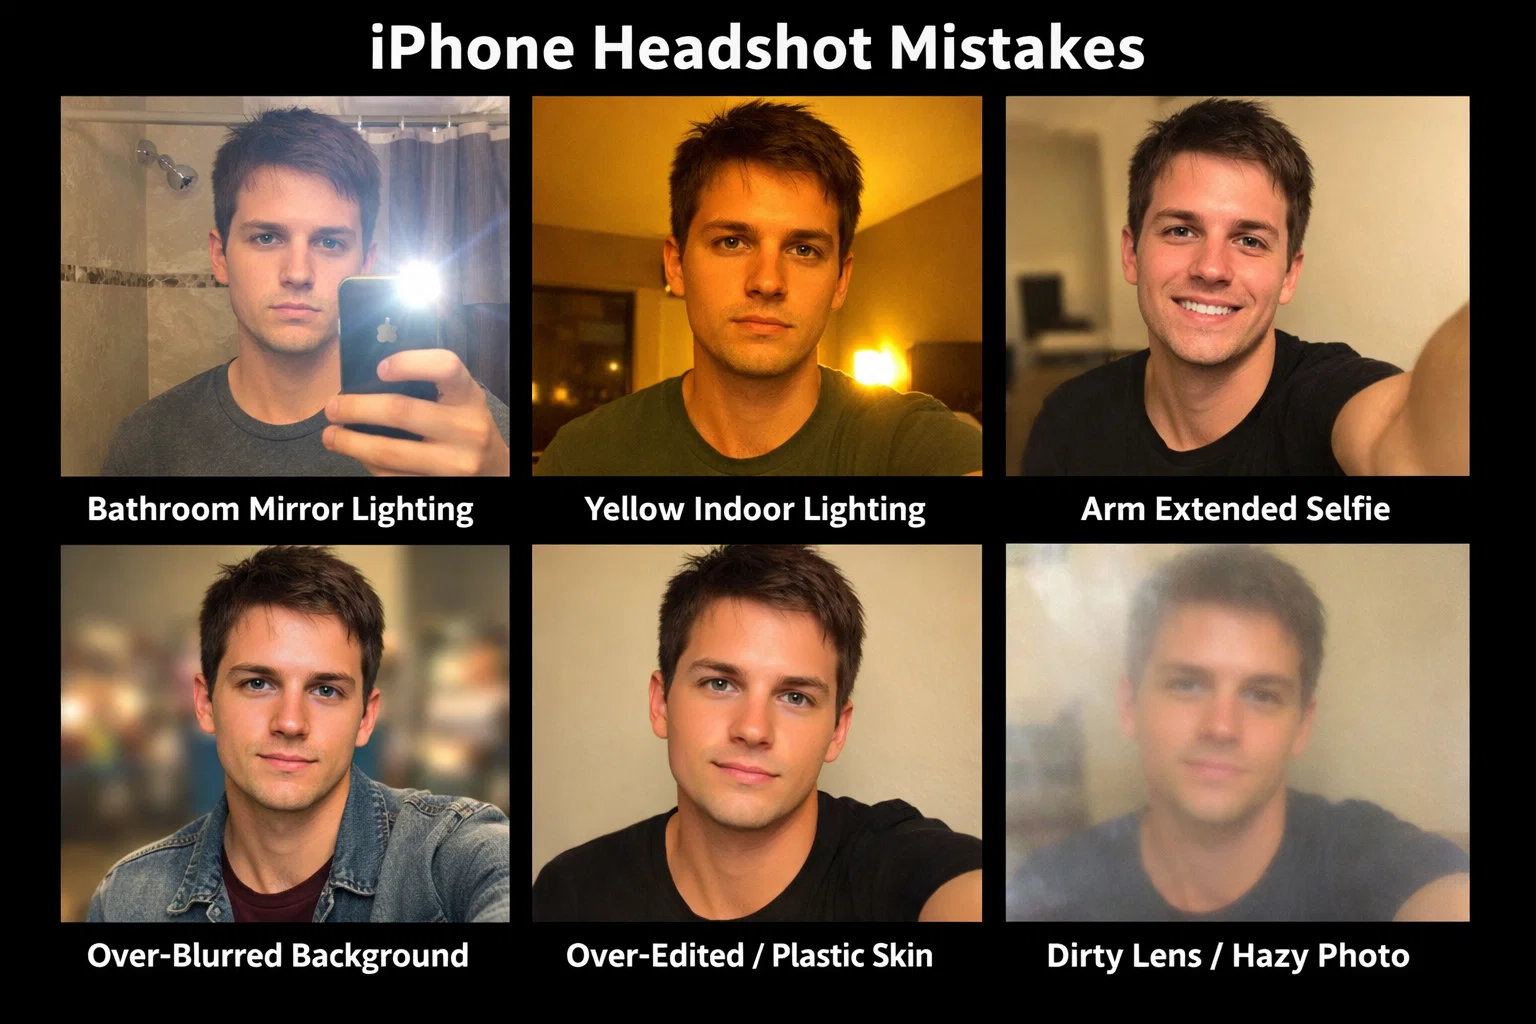
Mistake 1: Using the Bathroom Mirror
The lighting in your bathroom is designed to make you look terrible. Seriously. Overhead fluorescents create dark shadows under your eyes. You look exhausted. Stop.
Mistake 2: Taking Photos at Night with Indoor Lighting
Your house lights are ugly. All of them. Even that expensive lamp you bought. Indoor lighting at night creates unnatural color casts and harsh shadows. Shoot during the day by a window or accept that your photos will look amateur.
Mistake 3: Holding Your Phone at Arm's Length
Your arm gets tired. The angle is bad. Your face is distorted. The camera shakes. Stop doing this. Get a $15 tripod.
Mistake 4: Using Too Much Background Blur
Portrait mode with maximum blur looks fake. Your hair edge looks weird. Parts of your face disappear into blur. Dial it back to f/2.8 or f/4 for more natural results.
Mistake 5: Over-Editing Your Photos
You brighten it. Add contrast. Boost saturation. Sharpen it. Suddenly you look like a plastic doll. Less is more. Subtle edits only.
Mistake 6: Not Cleaning Your Lens
Your iPhone lens is covered in fingerprints and pocket lint. Every photo looks slightly blurry and you can't figure out why. Clean your lens before shooting.
DIY vs. AI: Which Path Is Right for You?
You now know how to take professional iPhone headshots yourself. The method works. People do it successfully.
Who should DIY:
- You enjoy photography and the creative process
- You have 60+ minutes to invest
- You only need photos occasionally
- Budget is your primary concern ($15-20 one-time for tripod)
Who should use AI:
- You're busy and need results fast (15 min vs. 60+ min)
- You need photos for multiple platforms
- You update your photos frequently (new hair, different looks)
- Time is more valuable than money to you
The DIY method requires:
- Buying a tripod ($15-20)
- Finding good lighting windows
- Clearing your background
- Taking 30-50 photos
- Selecting and editing the best ones
- Repeating this entire process for updates
The MyPicNow method:
- Upload 10-15 casual selfies (already on your phone)
- AI learns your face (5-10 min training)
- Generate unlimited professional headshots in any style (8 seconds each)
- Update anytime with new selfies
Both paths work. Choose based on whether you value time or money more.
Final Thoughts
Your iPhone is capable of taking professional headshots. The guide above works — thousands of people successfully DIY their headshots this way.
The question isn't "can you do it?" It's "do you want to spend an hour doing it?"
If you enjoy photography and have the time, the DIY method is rewarding and costs almost nothing.
If you're busy and need professional headshots fast, MyPicNow generates them from your existing selfies in 8 seconds. No tripod. No lighting setup. No 50 failed attempts.
Either way, you're getting professional headshots. Pick the path that fits your life.
Try MyPicNow — 8 Second Professional Headshots
FAQ
Q: Do I really need Portrait mode on my iPhone for DIY headshots? Yes, it makes a significant difference. Portrait mode creates professional-looking background blur and helps you stand out from the background. It's one of the easiest ways to elevate your iPhone headshots. If you skip this step, your photos will look more like casual snapshots.
Q: What if I don't have good natural lighting at home? This is the biggest challenge with DIY headshots. Window light during morning or late afternoon works best. If you don't have good windows, invest in a basic LED panel light ($20-30). Alternatively, MyPicNow fixes lighting issues in your source photos automatically — you can use photos taken in any lighting.
Q: How long does it actually take to shoot iPhone headshots myself? Your first session: 45-60 minutes (setup, shooting, editing). Once you know the process: 30-40 minutes for updates. If time is tight, MyPicNow generates professional headshots in 8 seconds from existing selfies — 15 minutes total for your first batch.
Q: Can I use the front-facing selfie camera for headshots? Not recommended. The selfie camera uses a wide-angle lens that distorts your face (makes your nose look bigger, face wider). Always use the back camera with a tripod for proper proportions. This is one advantage of AI headshots — they can correct for these distortions automatically.
Q: What's the biggest mistake people make with DIY iPhone headshots? Using the selfie camera at arm's length. This combines two problems: face distortion from the wide-angle lens and unflattering angle from holding the phone. Always use the back camera on a tripod at eye level.
Q: How often should I update my professional headshot? Whenever your appearance changes significantly. New haircut, glasses, facial hair, or significant weight change = time for new photos. DIY requires a full 30-60 minute reshoot. AI tools let you upload a few new selfies and generate updated headshots in minutes.
Q: Which iPhone models work best for headshots? iPhone 11 or newer works well. iPhone 12 Pro and later have better Portrait mode and can shoot in ProRAW format for advanced editing. iPhone 13+ has improved computational photography. But honestly, any recent iPhone (last 3-4 years) can produce good results with proper technique.
Q: Should I hire a professional photographer instead? Depends on your needs. For high-stakes situations (executive headshots, major acting auditions, magazine features), you can find professional photographers near you ($300-800). For LinkedIn, websites, and general professional use, DIY iPhone or AI headshots work great and cost a fraction of the price.